


Article: 5 Simple DIY Steps for a Flatweave Rug
5 Simple DIY Steps for a Flatweave Rug
What if you could craft a custom floor piece that perfectly fits your space without spending a fortune? This hands-on guide reveals how accessible textile creation can be—even if you’ve never held a weaving tool. Forget complicated techniques or specialty stores: you’ll need only basic supplies and a dash of creativity.

Traditional woven textiles offer unmatched durability and versatility. Their tight construction resists wear, while the flat profile slides easily under furniture. Best of all, you control every detail—dimensions, colors, and patterns align precisely with your vision.
This method works whether you’re combining smaller pieces or starting fresh. Follow our streamlined process during evenings or weekends. Pair it with your favorite playlist or show for a relaxing yet productive activity. By the end, you’ll have a functional art piece and newfound skills to tackle future home upgrades.
Key Takeaways
- Design a durable floor covering that matches your exact room dimensions and decor style
- Use affordable, easy-to-find materials for a budget-friendly upgrade
- Master basic weaving techniques in short, manageable sessions
- Create patterns that hide stains and wear for long-lasting use
- Adjust colors to refresh your space without repainting walls
Introduction to Your DIY Flatweave Rug Project
Imagine a world where your floor decor fits perfectly every time. Standard store options often leave gaps in odd-shaped rooms or clash with existing color schemes. This hands-on approach solves both problems while costing less than premium retail pieces.
"I finally stopped compromising on furniture placement thanks to my made-to-measure creation," shares Sarah K., a homeowner from Austin. Like many, she discovered tailored solutions beat mass-produced alternatives.
| Feature | Retail Options | Custom Creation |
|---|---|---|
| Cost (5'x8') | $300-$800 | $90-$150 |
| Size Flexibility | Limited | Any Dimensions |
| Pattern Control | Fixed Designs | Full Customization |
You don’t need weaving expertise – basic tools and household items form your starter kit. Most complete the project over two weekends, working at their own pace. Choose fabrics that hide pet hair or brighten dark corners through strategic color choices.
This method particularly shines in spaces like angled attic bedrooms or irregular kitchen nooks. Unlike premade rugs, your creation becomes a functional art piece reflecting personal taste. Transform leftover materials into cohesive designs, or start fresh with budget-friendly fabric rolls.
Why Choose a Flatweave Rug for Your Home?
Everyday life demands flooring solutions that balance style with practicality. Unlike thicker alternatives, flatwoven textiles withstand heavy foot traffic while maintaining their structural integrity. Their tight weave resists snags and compression, ensuring your floors stay polished even in busy hallways or play areas.

Spills become stress-free with reversible construction. Flip the piece to hide accidental stains—a game-changer for households with kids or pets. "Our cream-colored living room surface stayed pristine thanks to this feature," notes Chicago-based designer Mara Velez. The smooth texture also simplifies spot-cleaning, as liquids don’t seep into dense fibers.
These textiles excel in spaces demanding precise furniture placement. Dining chairs glide smoothly without catching on uneven surfaces. Their low profile prevents tripping hazards in narrow walkways while allowing doors to open freely.
Design flexibility lets you match existing decor effortlessly. Geometric patterns enhance contemporary spaces, while muted tones complement rustic themes. Create cohesive looks by aligning motifs across multiple sections or repurposing fabric remnants for accent pieces.
Allergy sufferers benefit from the thin profile that traps fewer dust particles. Weekly maintenance becomes quicker—no deep-pile vacuuming required. Whether refreshing a studio apartment or anchoring a sprawling family room, this approach adapts to your unique needs.
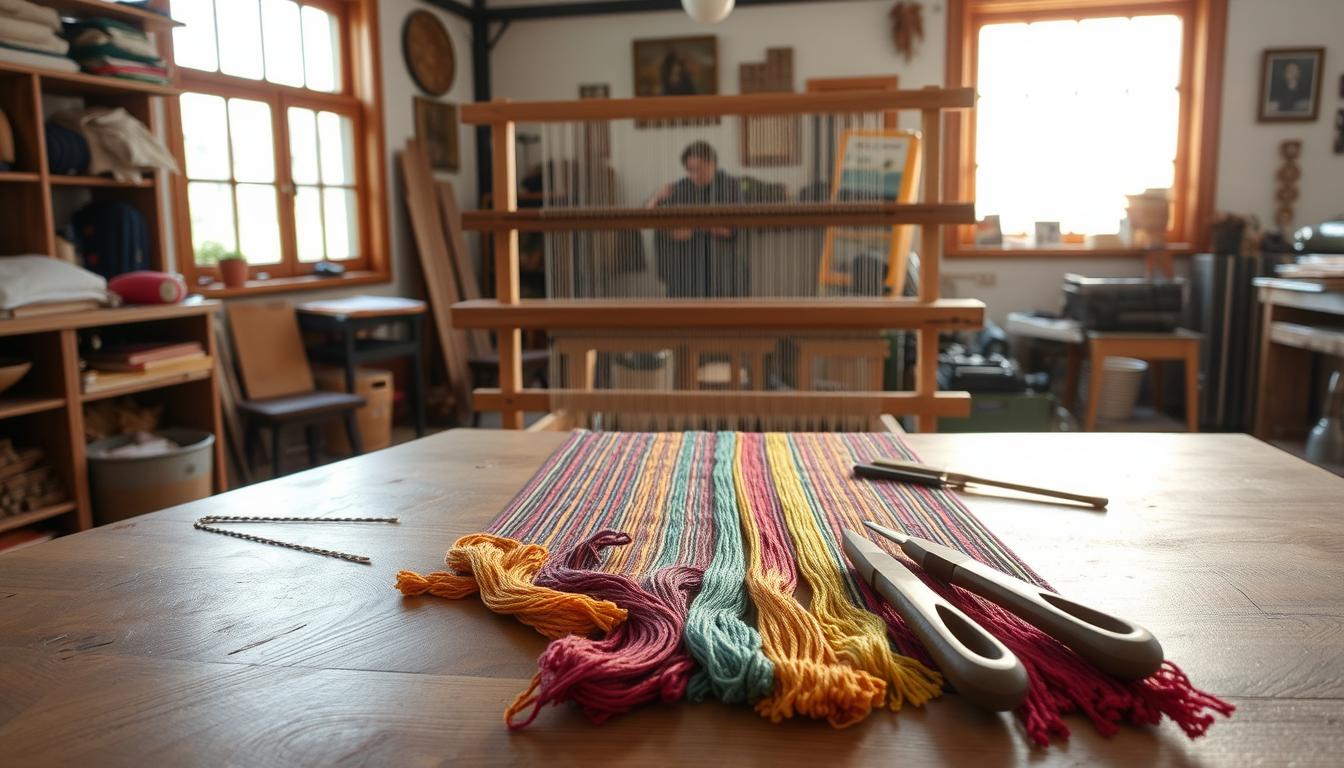
Gathering Materials & Essential Tools for Your Project
The right supplies transform a vision into reality. Choose between two approaches: connecting existing pieces or building new. For the first method, collect at least two smaller textiles—more if you want complex patterns. You’ll need heavy-duty twine and a bent paperclip to secure edges.
Starting fresh? Grab multi-use netting as your base. Cotton piping becomes your star player here—opt for ½-inch or 11/16-inch thickness for balanced texture. Small rubber bands or elastic string lock everything in place. Sharp scissors ensure clean cuts for professional results.
Source these materials from craft stores like JoAnn’s or online retailers. Bulk purchases save money, especially for large spaces. A 5x8 creation costs $300-$350—significantly cheaper than store-bought equivalents.
Remember: precise measurements matter. Cut netting to your desired dimensions first. Thicker cotton strands hide seams better, while thinner ones allow intricate designs. Test different combinations on small sections before committing.
Your toolkit stays simple. Beyond basics, keep a ruler nearby for consistency. With everything prepared, you’re ready to create something uniquely yours.
Understanding Your Rug's Design & Pattern Options
Your floor’s visual rhythm starts with smart pattern choices. Whether combining pieces or building new, alignment determines professional results. Examine stripes or geometric shapes closely—edges must meet precisely for seamless transitions.
Bold contrasts grab attention when patterns intentionally clash. For subtle harmony, match thread counts and directional flows. Flip pieces to test pattern continuity—identical sides prevent visual breaks.
| Approach | Effect | Best Use |
|---|---|---|
| Contrasting Patterns | Modern energy | Statement spaces |
| Coordinated Designs | Calming flow | Small rooms |
| Directional Alignment | Expanded space | Narrow areas |
Color planning prevents clashes with existing decor. Use fabric swatches against walls and furniture. Warm tones enhance cozy corners, while cool hues open airy spaces.
Sketch layouts before cutting materials. This reveals how stripes will frame your sofa or motifs might compete with drapes. Your perfect rug emerges when patterns complement room proportions.
Rotate pieces during dry runs. Diagonal placements create movement, while grid layouts promote order. Adjust until textures guide the eye through your space naturally.
Planning Your Space and Taking Accurate Measurements
Precision starts with your tape measure. Walk through your space while visualizing foot traffic and furniture placement. Mark boundaries with painter’s tape to test different layouts before cutting materials.
For seating areas, extend your creation 6-8 inches beyond sofa legs. Dining spaces require larger coverage—ensure chairs stay fully on the surface when pulled out. Use graph paper to sketch room dimensions and experiment with proportions.
| Target Size | Netting Pieces Needed | Total Length |
|---|---|---|
| 4×5 ft | 2 panels | 8 ft |
| 5×8 ft | 3 panels | 8 ft each |
Calculate material quantities using your room’s length and width. If joining smaller sections, add 4 inches to each measurement for overlap. This size guide helps balance aesthetics with functional walkways.
Account for door swings and transitions between flooring types. Leave 12-18 inches of bare floor around edges in smaller rooms. For irregular spaces, create templates using newspaper or cardboard.
Remember: Your final piece will shrink slightly during construction. Add 3% to measurements if using natural fibers. Explore this living room applications breakdown for room-specific ratios. Proper planning eliminates guesswork and material waste.
Prepping Your Rug Pieces for Weaving
Your creation’s longevity begins with meticulous preparation of individual components. Proper handling at this stage ensures patterns merge flawlessly and edges bond securely. Start by examining each section under bright light to spot flaws invisible in dim rooms.

Inspecting and Preparing Your Flatweave Pieces
Lay all sections face-up on a clean surface. Check for pulled threads, uneven edges, or discoloration. Use tweezers to remove debris trapped between fibers—this prevents bumps during assembly.
| Inspection Focus | Tool Needed | Action Required |
|---|---|---|
| Loose Warp Threads | Seam Ripper | Trim excess, secure ends |
| Stitch Removal | Small Scissors | Cut every 3rd stitch |
| Edge Cleaning | Lint Roller | Remove dust particles |
Locate the final folded stitch along each edge. Carefully undo these using quick snips—avoid tugging to preserve thread integrity. “Go slow here,” advises textile conservator Lila Monroe. “Rushed cuts create uneven edges that complicate later steps.”
Aligning Patterns for a Seamless Look
Arrange pieces in their final layout before joining. Match dominant lines or shapes across sections using painter’s tape as temporary guides. Rotate components to test directional flow.
Mark alignment points every 6 inches with washable fabric chalk. This prevents gradual shifts during the cleaning guide process and beyond. For complex designs, photograph the layout as a reference.
| Pattern Type | Alignment Technique | Margin of Error |
|---|---|---|
| Geometric | Grid Matching | 1/8 inch |
| Organic | Focal Point Alignment | 1/4 inch |
Secure loose warp threads with temporary knots. These vertical strands form the backbone of your join—handle them like precious wiring in a circuit board. Proper prep work now means fewer adjustments later.
Step-by-Step Process: Starting with the End Loops
Your journey to tailored home decor culminates in these final connection steps. By focusing on end loops and proper threading, you ensure lasting durability where it matters most. This phase transforms separate pieces into a unified surface ready for daily use.
Threading your modified paperclip through initial loops sets the stage for success. Pull enough twine to cover the full length—running short mid-process causes unnecessary frustration. Keep tension consistent as you work across joined edges for invisible seams.
Remember: alignment determines your final piece’s professional appearance. Those carefully matched patterns now flow seamlessly, hiding construction details beneath stylish surfaces. Your completed project withstands foot traffic while reflecting personal taste.
With these techniques mastered, you’ve gained skills applicable to future home upgrades. Swap colors seasonally or experiment with bold geometrics—your foundation allows endless reinvention. Enjoy both the creation and the satisfaction of crafting something uniquely yours.
FAQ
What materials work best for creating durable flatweave pieces?
Cotton and wool are popular choices due to their strength and flexibility. Cotton offers a lightweight feel, while wool provides warmth and resilience. Both materials hold color well, ensuring your pattern stays vibrant over time.
How do I ensure my design aligns properly during weaving?
Start by marking your warp threads at consistent intervals. Use a simple geometric or traditional motif to maintain symmetry. Double-check the alignment of each row before tightening the weft to avoid uneven gaps or overlaps.
Can I adjust the size if my space has unique dimensions?
Yes! Measure your area carefully, adding 2–3 inches to the length and width for trimming. Customize the warp threads to match your desired dimensions, and plan the pattern repeats to fit proportionally within the final measurements.
What tools are essential for securing tight, even loops?
A sturdy loom, comb beater, and sharp scissors are critical. A shed stick helps separate warp threads, while a shuttle ensures smooth weft insertion. For flatweaves, a wooden or metal comb presses rows tightly together for a polished finish.
How do I prevent fraying on the edges of my project?
Reinforce the selvage edges by doubling the warp threads or using a tighter weave. You can also wrap the outermost strands with a contrasting yarn or add a binding stitch once the weaving is complete for extra durability.
Are there low-maintenance options for high-traffic areas?
Wool is naturally stain-resistant and ideal for busy spaces. For a lighter option, tightly spun cotton resists wear. Opt for darker colors or speckled yarns to camouflage dirt, and avoid overly intricate patterns that show debris easily.