


Article: 4 Easy Steps to Make a Small Rug
4 Easy Steps to Make a Small Rug
What if creating a personalized floor piece costs less than buying designer versions? Many assume intricate home textiles require expert skills, but basic tools and patience unlock surprising possibilities.

A 5x8 floor accent demands about $300 in supplies – think cotton piping, netting, and rubber bands. Though projects consume 200+ yards of material, the process mirrors relaxing hobbies like knitting. Three core techniques adapt to different budgets and schedules, whether you prefer braiding or modern tufting tools.
This guide simplifies what looks complex. Bathroom mats might take an afternoon, while living room centerpieces become weekend achievements. You’ll choose materials confidently, from sturdy backing fabrics to specialized guns for plush textures.
Key Takeaways
- Three primary methods suit various skill levels: weaving, tufting, and braiding
- Material costs average $300-$350 for standard 5x8 projects
- Cotton piping requires netting and 200+ yards per rug
- Time commitment ranges from single afternoons to full weekends
- No prior experience needed – techniques build gradually
Introduction to Making a Small Rug
DIY floor projects surged in popularity as people seek creative outlets with functional results. Crafting your own textile piece offers unmatched customization – choose every thread's hue and pile height while staying within budget. Unlike store-bought options, handmade creations reflect personal style and withstand daily wear.
Three approaches dominate home crafting: cotton piping weaving, tufting, and fabric braiding. Each delivers distinct textures and suits different lifestyles. Compare them using this guide:
| Technique | Texture | Durability | Time |
|---|---|---|---|
| Cotton Weaving | Plush, cloud-like | High | 6-8 hours |
| Tufting | Professional-grade | Very high | 10-12 hours |
| Braiding | Rustic, textured | Moderate | 4-5 hours |
Cotton weaving excels for bedroom pieces needing softness underfoot. Tufting guns create gallery-worthy patterns but require practice. Braiding recycled fabrics appeals to eco-conscious crafters – transform old clothes into kitchen runners.
Beginners often start with braiding since it uses basic supplies. Intermediate creators tackle cotton weaving for its therapeutic rhythm. Tufting attracts detail-oriented work with stunning geometric results. No prior skills? Follow our tutorial for success.
Time investments vary, but even complex designs become manageable through step-by-step processes. Your finished piece will spark conversations while protecting floors – a win-win for stylish homes.
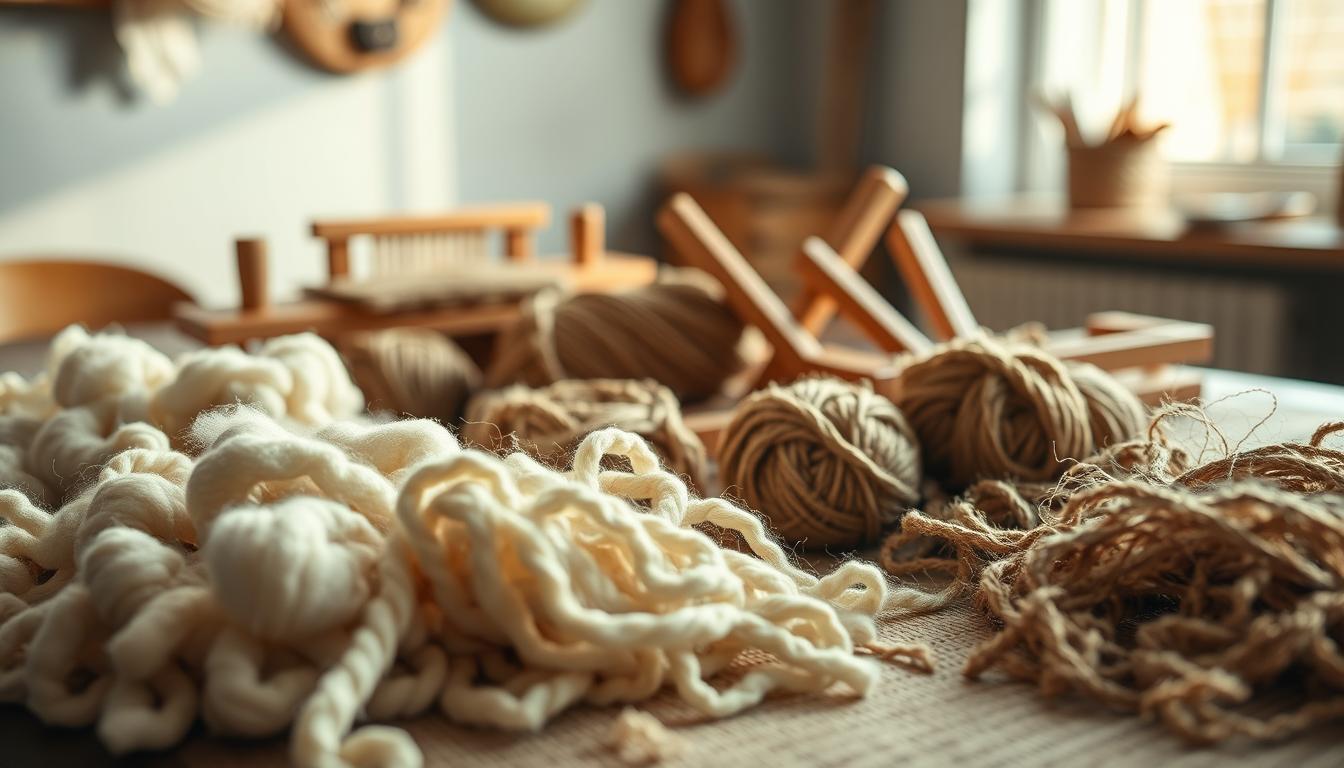
Gathering Your Materials
Every great rug begins with gathering the right tools and textiles. Your technique choice dictates which items you'll need, but all methods share common elements for structural integrity. Let's break down the essentials for each approach.
Essential Tools and Supplies
Sharp scissors top every crafter's checklist – they cleanly cut fabrics without fraying edges. Rubber bands or durable string secure cotton piping during weaving, while tapestry needles weave loose ends seamlessly. Tufting demands specialized guns for precise yarn placement, though braiding repurposes old textiles with basic supplies.
Materials: Cotton Piping, Netting, and More
Cotton piping remains the star for weaving projects. Opt for 1/2-inch or 11/16-inch thickness to balance speed and plushness. Multi-use netting forms the foundation – its width determines how many panels you'll need for larger designs.
| Technique | Key Materials | Average Cost |
|---|---|---|
| Weaving | Cotton piping, netting | $300-$350 |
| Tufting | Yarn, monks cloth backing | $400+ |
| Braiding | Recycled fabrics, string | $20-$50 |
Backing fabrics like burlap or monks cloth stabilize tufted patterns, while braiding thrives on repurposed t-shirts. Yarn choices range from wool blends for durability to acrylics for vibrant hues. Remember: quality materials prevent unraveling and ensure years of use.
Understanding Different Rug Techniques
Crafting floor decor involves choosing techniques that align with your vision and resources. Each method offers unique textures and challenges, from airy cotton clouds to structured geometric patterns. Your choice impacts material costs, time investment, and final aesthetics.

Cotton Piping Weaving Method
The cotton piping approach creates pillowy surfaces through simple looping. Cut 4-inch piping segments and thread them through netting grids. Secure each piece with rubber bands for a cloud-like pile that feels luxurious underfoot.
This technique requires no specialized machine – just patience and attention to spacing. Expect to use 200+ yards of piping for standard sizes. Finished pieces work well in bedrooms or nurseries where softness matters most.
Exploring Tufting and Braiding Approaches
Tufting guns inject yarn through backing fabric at high speed, creating dense patterns. Choose between loop pile (for durability) or cut pile (for velvet-like textures). This method suits detailed designs but demands practice.
Braiding transforms old fabrics into coiled masterpieces. Twist strips of t-shirts or bedsheets into three-strand ropes. Interlock them in spiral patterns using basic stitching. The rustic results add charm to kitchens without breaking budgets.
| Technique | Materials | Time | Texture |
|---|---|---|---|
| Cotton Weaving | Piping, netting | 6-8hrs | Plush |
| Tufting | Yarn, monks cloth | 10-12hrs | Dense |
| Braiding | Recycled fabrics | 4-5hrs | Textured |
Consider your priorities: cotton for comfort, tufting for precision, braiding for sustainability. Mix techniques within one project – tuft borders around braided centers create striking contrasts. Your floors become canvases for personal expression.
Planning Your Rug Size and Design
Proper planning separates functional floor art from haphazard experiments. Start by mapping your space with painter's tape – outline where edges should align with furniture legs or room boundaries. This visual guide prevents material waste and ensures proportions complement your layout.
Measuring Your Space Accurately
Grab a steel tape measure for precision – cloth tapes stretch and distort numbers. Record both length and width in feet, rounding up to the nearest half-foot. For example, a 4'7" area becomes 5 feet in calculations. Standard netting rolls span 24 inches wide, forcing creative joins for broader designs.
| Rug Size | Netting Pieces | Total Length |
|---|---|---|
| 5x8 feet | 3 panels | 24 feet |
| 4x6 feet | 2 panels | 12 feet |
| 3x5 feet | 1 panel | 8 feet |
High-traffic zones like entryways demand rugged durability over delicate patterns. Bedrooms allow softer textures since feet contact happens at slower speeds. Always leave 18-24 inches of bare floor around room perimeters for visual balance.
Design Considerations for Unique Rugs
Complex motifs risk distortion when fibers compress under furniture.
"Limit intricate details to borders or central medallions that avoid heavy foot traffic,"
advises textile artist Mara Chen. Tufting handles geometric precision better than braided coils, which favor organic shapes.
Your living room dimensions dictate whether a 7x10 centerpiece or layered 5x8 accents work best. Lighter hues expand cramped spaces visually, while dark tones ground sprawling areas. Remember: bold colors fade faster in sunlit rooms.
Cutting the Netting and Preparing Fabric
Sharp tools transform fabric prep from chore to craft. Begin by unrolling netting on a flat surface, smoothing wrinkles with your palms. Measure twice before slicing – a single straight edge ensures panels align perfectly during assembly.
Cotton piping demands exact 4-inch segments. Let slight length variations (¼ inch max) add artisanal charm. For braiding projects, tear old tees into 1-3 inch strips – wider cuts from bedsheets prevent unraveling. Rotary tools slice through multiple layers faster than scissors, saving hours on bulk prep.
Tips for Precise Cutting and Assembly
Sort materials by color or texture before starting. This visual system prevents mid-project chaos. Keep a waste basket nearby – clipped threads pile up fast.
| Material | Ideal Width | Tool |
|---|---|---|
| T-shirts | 1-3 inches | Rotary cutter |
| Sheets | 2-3 inches | Fabric scissors |
| Cotton piping | 4 inches | Sharp shears |
Label containers as you go. Misplaced strips derail creative flow. One crafter’s mantra applies:
"Measure with focus, cut with confidence."
Precision here prevents gaps in woven patterns. Neat stacks of prepared fabric become your roadmap – follow them to avoid costly redos.
Preparing the Cotton Piping
Your rug's comfort and durability start with smart material decisions. Thickness variations in cotton piping directly influence both construction speed and the final product's tactile appeal. Let’s simplify your selection process.

Choosing the Right Piping Size
Standard piping ranges from ¼-inch to 1-inch diameters. Mid-range options like ½-inch and 11/16-inch strike the best balance for most cotton projects. These sizes create substantial texture without overwhelming netting grids.
| Piping Size | Yards Needed | Construction Time | Best For |
|---|---|---|---|
| ¼-inch | 300+ | 12+ hours | Delicate accents |
| ½-inch | 220 | 8 hours | Living spaces |
| 1-inch | 180 | 6 hours | Outdoor use |
Thinner than ½-inch? You’ll need to double strands in each netting square for proper density. Oversized 1-inch piping saves time but challenges securing techniques. Textile expert Lila Monroe advises:
"Always test three sample squares with your chosen size before cutting bulk material."
A 5x8 rug demands 200+ yards regardless of thickness. This cotton piping project guide shows how to calculate exact needs based on your dimensions. Remember: thicker options reduce yardage but require stronger anchoring methods.
Would like a plush feel without bulk? The 11/16-inch size offers hidden benefits – its slightly oval shape fills netting gaps more effectively than round counterparts. Keep a mix of sizes for border detailing in complex patterns.
Weaving and Securing Your Rug Elements
Transforming loose materials into cohesive designs begins with proper anchoring techniques. This critical step determines both visual appeal and long-term durability. Start by threading prepared cotton segments through each netting square, ensuring consistent tension across the grid.
Techniques for Weaving and Tying
Pull cotton pieces upward until 2 inches protrude above the netting. Secure each cluster with small rubber bands, creating uniform tufts. For intricate patterns, work in sections – complete 12-15 squares before moving to adjacent areas.
Fluffing transforms flat bundles into plush pom-poms. Gently separate cotton fibers using your fingertips, rotating each tuft until fully rounded. Textile artist Elena Rodriguez notes:
"This process becomes meditative – each fluffed section adds depth to your creation."
Using Rubber Bands or String Effectively
While rubber bands offer speed, consider waxed string for high-traffic areas. Double-knot each tie and trim excess with sharp scissors. Compare fastening options:
| Material | Install Time | Longevity |
|---|---|---|
| Rubber bands | 45 sec/tuft | 2-3 years |
| Waxed string | 90 sec/tuft | 5+ years |
Rotate your work frequently to maintain even tension. Left-handed crafters might find clockwise rotation easier, while right-handed creators prefer counter-clockwise motions. The repetitive nature allows multitasking – pair this step with podcasts or audiobooks.
Expect to refine your technique over the first hour. Initial clusters may feel awkward, but muscle memory develops quickly. Completed sections reveal a cloud-like surface that rewards patience with every comforting step.
Essential Tips on how to make Small Rug
Consistency transforms handmade projects from amateur experiments to professional-looking pieces. Whether working with yarn loops or cotton clusters, even surfaces start with strategic material placement.
Mastering Material Distribution
Row spacing determines density – thick yarn needs ¼-inch gaps, while thin strands sit nearly touching. Test three sample squares first. This reveals how different spacing affects both appearance and comfort underfoot.
| Yarn Thickness | Ideal Spacing | Strands per Row |
|---|---|---|
| Bulky (6mm+) | 0.3 inches | 1 |
| Medium (4-5mm) | 0.2 inches | 2 |
| Fine (2-3mm) | 0.1 inches | 3 |
Apply steady pressure when securing materials. Uneven tension creates lumpy areas that wear faster. Textile designer Clara Ruiz advises:
"Work in one-foot sections, checking height with a ruler every third row."
Rotate your project frequently to spot inconsistencies. Natural light reveals subtle variations in pile height. Adjustments become easier when caught early – gently tighten loose clusters or fluff compressed areas.
Efficient DIY Techniques for Quick Results
Crafting doesn't have to mean endless hours – smart strategies balance speed with lasting quality. By optimizing your process, you'll finish projects faster while maintaining the handmade charm that makes each piece special.
Time-Saving Methods for Busy DIYers
Thicker cotton piping covers more area per piece, cutting installation time by 30%. Pair this with a rotary cutter for fabric strips – it slices through five layers at once, perfect for braiding projects. Textile expert Marco Torres notes:
"Organizing materials into color-coded bundles before starting creates workflow momentum. You’ll spend less time searching and more time creating."
| Tool | Time Saved | Best For |
|---|---|---|
| 1-inch piping | 2 hours | Large surfaces |
| Rotary cutter | 45 minutes | Strip preparation |
| Yarn winder | 30 minutes | Tufting projects |
Maintaining Quality While Speeding Up the Process
Complete all cutting first using an assembly-line approach. This prevents mid-project pauses that disrupt rhythm. Check every tenth tuft or braid for consistency – quick adjustments keep errors from multiplying.
Rewind yarn onto cardboard tubes before tufting to avoid tangles. For woven rugs, keep a small bowl nearby for trimmed rubber bands. These simple ways to organize your workspace let you focus on precision without sacrificing speed.
Adapting Techniques for Different Rug Sizes
Custom floor pieces thrive on flexible approaches. Whether crafting a cozy bath mat or sprawling living room centerpiece, your technique adapts through smart scaling. Focus shifts between speed and complexity based on dimensions.
Scaling Projects Effectively
A 2x3-foot bathroom accent takes 4-6 hours with single netting panels. Larger 5x8-foot rugs demand weekend efforts and multiple material joins. Thicker cotton piping covers more square feet faster – ideal for expansive spaces.
Room-Focused Adjustments
Measure doorways before designing hallway runners. Narrow entries work best with 18-24 inch widths. For open-concept rooms, layer smaller pieces instead of one oversized textile. This simplifies cleaning and style updates.
| Size | Netting Panels | Time |
|---|---|---|
| 2x3 feet | 1 | Half-day |
| 4x6 feet | 2 | 8 hours |
| 5x8 feet | 3 | Weekend |
Optimize fabric usage by sketching layouts first. Diagonal patterns on odd-shaped rugs minimize waste. Remember: every size serves both function and artistic vision when planned thoughtfully.
FAQ
What materials work best for durable edges on handmade rugs?
Cotton fabric or piping provides sturdy edges that resist fraying. Pair them with non-slip backing for added stability. A sewing machine ensures tight seams, while fabric glue offers quick fixes for minor adjustments.
Can I use yarn colors to customize designs without advanced skills?
Yes! Experiment with two or three complementary yarn shades for striped or geometric patterns. For tufted rugs, layer colors using a punch needle. Braiding techniques also let you blend hues seamlessly.
How do I prevent fabric from shifting during assembly?
Secure netting or burlap with rubber bands or clamps before weaving. For larger pieces, spray adhesive lightly on the backing. Trim excess material with sharp scissors to maintain clean edges.
What’s the fastest method for creating a 2x3-foot rug at home?
Braiding pre-cut fabric strips takes under 4 hours. Use a sewing machine to join rows, or hand-stitch for portability. Pre-measure your space to avoid sizing errors—mark lengths with chalk for precision.
Does pile thickness affect the rug’s durability on hardwood floors?
Thicker piles cushion high-traffic areas but require denser weaving. For thin rugs, add a latex backing to prevent slips. Balance texture and practicality based on your room’s foot traffic.
Can I repurpose old fabric scraps for eco-friendly projects?
Absolutely. Cut cotton T-shirts or denim into 1-inch strips for braided rugs. Use netting as a base to weave scraps—this reduces waste and creates unique textures. Wash materials first to avoid shrinkage.
How do I fix uneven edges after cutting the netting?
Trim jagged sections with pinking shears or apply fray-check liquid. For woven rugs, tuck loose threads under adjacent rows and secure with a drop of fabric glue. Press edges with an iron for a polished finish.
