


Article: 5 Quick Steps to Make a Throw Rug
5 Quick Steps to Make a Throw Rug
What if you could design a rug that perfectly matches your style without spending a fortune? Most people assume custom home decor requires expert skills or pricey tools. But with basic supplies and a dash of creativity, you’ll craft a unique piece that elevates any room.

This guide reveals simple methods to create a DIY masterpiece. Use cotton piping, fabric scraps, or even old t-shirts. No loom? No problem. These techniques work for beginners and let you choose colors, patterns, and sizes that fit your space.
Imagine walking into a room where every detail reflects your personality. Your new project could be the centerpiece that ties your home together. Best of all, you’ll save money while expressing your creativity.
Key Takeaways
- Design rugs in any size or style to match your decor
- Use affordable materials like fabric scraps or recycled clothing
- Complete the process with basic tools and zero special skills
- Save hundreds compared to store-bought alternatives
- Customize colors and textures for a truly unique piece
Introduction to DIY Throw Rugs
Transforming your floors starts with one creative decision. DIY rugs let you design floor art that mirrors your personality while fitting your budget. Whether you prefer bold geometric patterns or soft organic shapes, every choice becomes a reflection of your taste.
Complete control over colors and textures sets homemade floor coverings apart. You select materials that blend with your room's existing palette or create intentional contrasts. Need a runner for narrow hallways? Craft it exactly 24" wide. Want circular accents for round tables? No extra fees for custom shapes.
Store-bought alternatives often cost $200+, but your version might use $15 worth of fabric scraps. Repurpose old jeans, curtains, or yarn leftovers instead of tossing them. One maker turned 12 worn t-shirts into a plush living room centerpiece – saving $300 on retail prices.
The satisfaction of completing a DIY project lasts longer than any store receipt. Each step – from planning to final stitch – adds meaning to your home decor. Friends will admire pieces they can't find in catalogs, while you enjoy knowing every thread’s origin story.
Tools and Materials for Making Your Throw Rug
Your creative journey begins with the right tools at your fingertips. Whether using cotton piping or repurposed fabric, selecting quality materials transforms simple ideas into stunning floor art. Most supplies cost less than $20 and hide in plain sight at local craft stores or your closet.
Essential Supplies from Cotton Piping to Netting
Cotton piping forms the backbone of many designs. Available in 1/4" to 1" widths at stores like JoAnn Fabrics, thicker options (1/2" or 11/16") speed up your work. Pair it with multi-use netting – a grid-like base that holds everything together. Small rubber bands lock each piece in place without special tools.
For fabric-based approaches, vinyl flooring remnants create durable foundations. Home improvement stores sell these cheaply in their clearance sections. Add spray adhesive and polyurethane for weather-resistant finishes in entryways or patios.
Budget-Friendly Options and Craft Store Finds
Transform old t-shirts or bedsheets into coiled masterpieces using only scissors and string. One crafter remarked:
"The best DIY projects often start with what you already own – my favorite rug used 14 concert tears from college!"
| Material Type | Best For | Average Cost | Where to Buy |
|---|---|---|---|
| Cotton Piping | Textured designs | $3.99/yard | Fabric stores |
| Vinyl Remnants | Outdoor/heavy-use areas | $1.50/sq.ft | Home improvement centers |
Check remnant bins at Michaels or Hobby Lobby for discounted fabric rolls. With smart shopping, your total spend often stays under $15 – 90% cheaper than retail alternatives.
Planning Your Rug Project: Size, Color, and Style
Smart preparation turns your vision into a functional reality. Start by measuring your space – leave 12-18 inches between furniture edges and the rug size for balanced proportions. High-traffic zones like entryways demand smaller dimensions, while a living room centerpiece might span 8x10 feet.

Color impacts both aesthetics and upkeep. Earthy tones hide dirt in busy areas, while bold patterns distract from stains. One designer notes:
"Mid-tone blues and greens age gracefully – they don’t show wear like beige or black."
Texture choices depend on your room's role:
- Braided jute: Adds rustic charm to porches
- Flat-weave cotton: Slides easily under dining chairs
- Plush wool: Creates cozy bedroom accents
Consider your project's primary function. Will it anchor a seating area? Define zones in open layouts? Or protect floors from muddy shoes? Answering these questions ensures your creation fits seamlessly into daily life.
Understanding the Basics: What is a DIY Throw Rug?
At its heart, a DIY rug is more than decor—it's a statement of creativity. These handmade pieces transform ordinary materials into functional art that serves your space uniquely. Unlike mass-produced options, every stitch reflects your vision.
Commercial floor coverings limit choices. Your version adapts to room dimensions, color schemes, and texture preferences. Want a triangular area rug for awkward corners? No extra charges for unconventional shapes.
Portability defines these creations. Shift them seasonally from bedrooms to patios without commitment. One designer explains:
"Movable accents let spaces evolve with your life—yesterday’s nursery mat becomes tomorrow’s yoga studio essential."
The method matters as much as materials. Whether braiding fabric strips or knotting yarn, techniques determine durability and style. Your approach could revive forgotten textiles or showcase new skills.
Cost savings shine here. Retailers markup similar items 300-500%, while your diy project might repurpose unused resources. That stained tablecloth? Now it’s a vibrant kitchen mat with sentimental value.
how to make Throw Rug
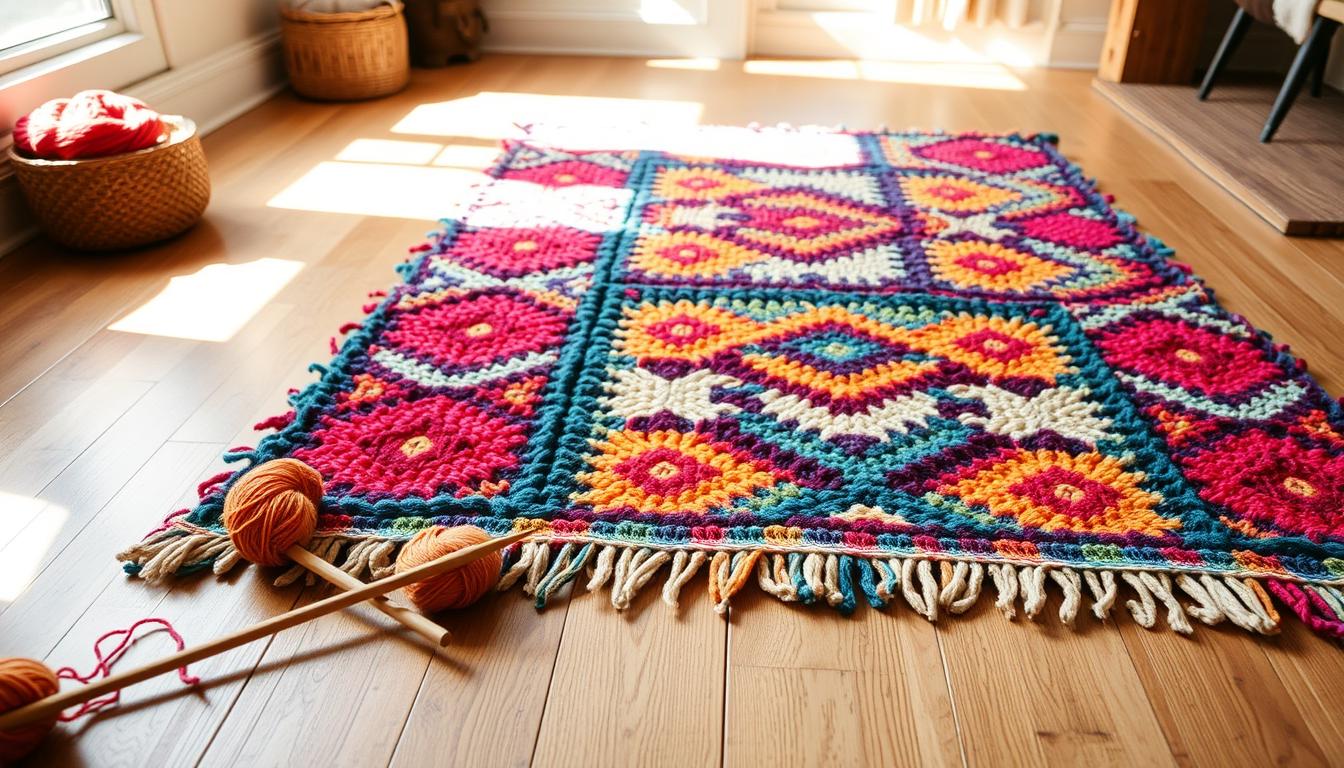
Three standout approaches let you create floor decor that suits your needs. The cotton piping technique produces cloud-soft surfaces using mesh grids. Cut piping into 4-inch segments, thread through netting holes, and secure with rubber bands. Fluff ends for a pom-pom texture that feels luxurious underfoot.
For high-traffic zones, fabric-vinyl combos shine. Apply polyurethane coating to cotton blends or denim scraps layered over vinyl remnants. This creates wipeable surfaces ideal for mudrooms or kitchens. One crafter notes:
"Our entryway piece survived three Midwest winters – spills wipe off in seconds."
Braided designs offer timeless appeal:
- Cut old textiles into 2-inch strips
- Weave three strands tightly
- Coil braids into circular/oval shapes
Consider these factors when choosing your method:
| Technique | Time Needed | Skill Level |
|---|---|---|
| Cotton Piping | 6-8 hours | Beginner |
| Fabric-Vinyl | 3-4 hours | Intermediate |
Your diy project becomes more than decor – it’s problem-solving through creativity. Whether prioritizing plush comfort or stain resistance, these approaches adapt to your space’s demands.
Step-by-Step: Preparing Your Netting and Cotton Piping
Mastering material prep separates amateur attempts from polished creations. Precision here determines your rug's durability and visual appeal. Let’s break down the essentials for flawless execution.
Measuring and Cutting Your Netting Precisely
Standard netting comes in 24-inch widths. For a 5x8-foot size, you’ll need three 8-foot-long pieces. Mark measurements with fabric chalk before cutting. Sharp scissors prevent frayed edges that misalign during assembly.
Lay netting strips side by side. Overlap edges by half an inch for seamless joining later. One crafter shared:
"Double-checking measurements saved me hours of rework – measure twice, cut once!"
Cutting and Sizing the Cotton Piping for Texture
Each 4-inch cotton segment adds plushness. A 5x8 rug requires 200+ yards – roughly 1,800 pieces. Use a rotary cutter for speed, but embrace slight length variations (3.8"-4.2") for organic charm.
Sort cut piping into batches. Store them in labeled bins to maintain workflow efficiency. This step might feel tedious, but organized prep prevents mid-project chaos.
| Technique | Pieces Needed | Time Investment | Tools Required |
|---|---|---|---|
| Netting Prep | 3 strips | 15 minutes | Scissors, measuring tape |
| Cotton Cutting | 1,800+ segments | 2-3 hours | Rotary cutter, self-healing mat |
Consistent cotton lengths ensure even density across your rug. Test a small section – if piping stands upright without drooping, you’ve nailed the size.
Crafting Techniques: Weaving and Securing Piping
Transform loose materials into plush floor art through precise assembly steps. This phase determines your creation's texture and durability, turning basic supplies into a functional masterpiece.
Mastering the Weave Pattern
Thread each cotton segment through the netting grid, spacing them evenly. Pull upward until 1 inch remains at the base. Consistent tension prevents sagging – imagine threading 1,800 tiny buttons through mesh fabric.
One designer shares:
"The secret lies in rhythm. Three segments per minute keeps projects moving without hand fatigue."
Fastening Methods Compared
Small rubber bands create instant pom-pom texture when wrapped around piping ends. For long-term durability, consider elastic string:
| Method | Speed | Longevity |
|---|---|---|
| Rubber Bands | 5 sec/knot | 2-3 years |
| Elastic String | 20 sec/knot | 5+ years |
Fluff secured cotton ends outward using your fingers. This step transforms flat bundles into cloud-like tufts. Rotate the piece frequently to maintain uniform density across all sides.
Alternative materials like nylon cord work for outdoor pieces, though they lack the softness of natural fibers. Your chosen method should balance time investment with intended use – entryway rugs demand sturdier fasteners than bedroom accents.
Assembling the Rug Pieces and Joining Methods
Bringing your creation together requires precision and patience. Align netting sections edge-to-edge, ensuring grid holes match perfectly. Thread cotton piping through adjacent openings from both pieces to fuse them into one cohesive unit.
Secure connections using the same method from earlier steps. Rubber bands create instant pom-pom texture, while elastic string offers lasting strength. A seasoned crafter advises:
"Treat each junction like a handshake – firm enough to hold, gentle enough to maintain shape."
Critical factors for seamless joins:
| Technique | Speed | Durability |
|---|---|---|
| Rubber Bands | Fast | Moderate |
| Elastic String | Slow | High |
Inspect edges after joining three sections. Run your palm across the surface – any snags or dips signal misalignment. Adjust tension before proceeding to maintain uniform texture throughout your project.
This step determines long-term performance. Tight connections prevent unraveling in high-traffic zones, while proper spacing allows easy cleaning. Your attention here transforms separate pieces into one functional masterpiece.
Alternative Methods: DIY Rug Using Fabric and Vinyl
Durable floor accents don’t require expensive materials – just smart combinations. Fabric-vinyl hybrids merge style with practicality, offering wipeable surfaces ideal for busy households. This approach transforms remnants into custom pieces that withstand daily wear while matching your decor.

Using Vinyl Remnants and Fabric for a Custom Look
Start with vinyl flooring scraps from home improvement stores – often priced under $2 per square foot. Cut your chosen fabric 3 inches wider than the vinyl on all sides. A craft blogger shared:
"This method lets you showcase bold prints without worrying about stains – perfect for pet owners!"
Spray adhesive creates instant bonding between layers. Smooth fabric outward to eliminate wrinkles before trimming excess. Fold edges under the underside rug and secure with duct tape for clean lines.
Applying Polyurethane for a Durable Finish
Three coats of water-based polyurethane transform ordinary cloth into spill-proof surfaces. Allow 2 hours between applications for proper drying. Test a scrap first – some fabrics darken slightly during treatment.
| Coats Applied | Dry Time | Water Resistance |
|---|---|---|
| 1 | 2 hours | Light splashes |
| 3 | 6 hours | Full protection |
This diy solution works well in kitchens and bathrooms. Unlike store-bought options, you control both pattern placement and texture depth. Maintain your creation by wiping spills promptly with damp cloths.
Innovations in DIY Rug Making: Braiding and Coiling Techniques
Revolutionize your space with timeless braiding methods that transform fabric scraps into functional art. Old t-shirts become plush floor accents – ten shirts craft a 2x3-foot piece perfect for bedside nooks. Full bedsheets yield larger designs through strategic cutting and stretching.
Two approaches dominate braided creations. The coil-as-you-go method lets you spiral fabric strips while securing them with a sewing machine or hand stitches. Braid-first techniques involve weaving three one long strand before coiling into circular patterns. Both styles prevent curling when using cotton blends with moderate tension.
For detailed guidance, explore this step-by-step t-shirt rug guide. It reveals professional tricks like pre-stretching materials and alternating strip widths. Your finished piece becomes a conversation starter – proof that sustainability and style coexist beautifully.
FAQ
What materials work best for a durable throw rug?
Cotton piping and sturdy netting are ideal for creating texture and longevity. Budget-friendly options like fabric scraps or vinyl remnants from craft stores also work well for custom designs.
Can I use a sewing machine to finish the edges?
Yes! A sewing machine ensures clean, secure edges. For no-sew methods, rubber bands or strong string can hold fabric strips in place while weaving through netting.
How do I prevent fraying on fabric-based rugs?
Apply polyurethane to the underside of the rug or fold raw edges inward before securing. This adds durability and maintains a polished look over time.
What’s the easiest way to join rug pieces together?
Braiding or coiling techniques create seamless joins. For flat rugs, overlap sections by 1–2 inches and stitch them tightly using heavy-duty thread or fabric glue.
Are there alternatives to netting for weaving projects?
Non-slip vinyl or burlap can replace netting. These materials add grip and work well with thicker fabrics like cotton piping or recycled denim strips.
How long does it take to complete a small area rug?
A 24x36-inch rug takes 4–6 hours, depending on complexity. Pre-cutting materials and organizing fabric strips beforehand speeds up the process.
Can I wash a handmade rug without damaging it?
Spot-clean cotton or fabric rugs with mild detergent. For machine-washable options, use a gentle cycle and air-dry flat to preserve shape and color.
What’s the best way to add non-slip backing?
Attach adhesive grip pads or spray the underside with rubberized coating. Both methods prevent sliding while protecting floors from scratches.
How do braiding techniques enhance rug durability?
Tightly coiled or braided designs distribute weight evenly, reducing wear. This method works well with thick cotton piping or repurposed fabric strips.