


Article: 5 Bold Steps to Make a Tufted Rug Yourself
5 Bold Steps to Make a Tufted Rug Yourself
Imagine transforming raw materials into a stunning floor piece that reflects your personal style. Rug tufting has exploded in popularity, with creators worldwide sharing their vibrant projects on social platforms. This hands-on craft combines artistic expression with practical home decor - and it's more accessible than you might think.

Modern electric tools have revolutionized textile arts, letting beginners achieve professional results. The process involves pushing yarn through a sturdy canvas base using specialized tools, followed by securing layers for durability. Whether crafting wall hangings or functional floor coverings, this method offers endless design flexibility.
Our guide reveals five essential stages for successful fabric art creation. You'll learn to select materials like wool for softness or synthetic fibers for high-traffic areas. Discover why proper latex application prevents shedding and how fabric backing gives projects a polished finish. These must-know facts about tufted rugs form the foundation for any successful project.
Key Takeaways
- Electric tufting tools enable precise yarn placement for intricate patterns
- Three-layer construction ensures durability and professional appearance
- Material choices impact both aesthetics and functionality
- Proper technique prevents common beginner errors
- Custom designs can be completed in surprisingly little time
- Versatile process adapts to various home decor items
Follow our battle-tested methods to navigate each phase confidently. From initial sketch to final trim, you'll gain skills that transform simple supplies into heirloom-quality pieces. The satisfaction of walking on something you created lasts far longer than store-bought alternatives.
Introduction to Tufted Rug Crafting
Modern artisans are rediscovering an ancient craft with a high-tech twist. Electric tufting guns have transformed this textile tradition into a viral creative movement. Unlike traditional hand-sewing methods, these tools let you inject yarn through fabric at remarkable speed.
The magic happens on stretched canvas where colorful patterns emerge with each pass. You control every detail – loop heights, color transitions, and texture variations. This immediate visual progress fuels creativity, making each session rewarding.
Beyond floor coverings, crafters produce wall art, functional accessories, and sculptural pieces. The technique’s flexibility shines in geometric patterns and photorealistic portraits alike. An in-depth guide to tufted textiles reveals countless applications from coasters to statement furniture pieces.
Social platforms overflow with mesmerizing creation videos that showcase the craft’s hypnotic rhythm. Beginners often surprise themselves with professional-looking results on initial attempts. Seasoned artists appreciate the medium’s capacity for intricate detail work.
This resurgence blends centuries-old practices with contemporary aesthetics. Whether replicating vintage motifs or experimenting with abstract shapes, your personal style guides the outcome. The process respects tradition while embracing modern efficiency – perfect for today’s fast-paced creative culture.
Essential Tools and Materials for Tufted Rug Making
Crafting success begins with selecting the right arsenal of tools. Your equipment choices directly affect project speed, design complexity, and final durability. Let's break down the core components every creator needs.

Choosing Your Tufting Gun or Punch Needle
Manual punch needles work for small projects but demand more effort. Electric tufting guns dominate larger creations, injecting yarn 10x faster with less wrist strain. Two primary types exist: cut pile models trim loops automatically, while loop pile versions preserve texture.
Combination guns offer both styles but weigh more. Budget-friendly options from Chinese vendors start around $150. For premium US-made tools, Tim Eads' tuftinggun.com offers robust models from $275. Consider project frequency before investing.
Selecting Backing Fabric and Yarn
Monks cloth reigns supreme for its tight, even weave. This premium fabric prevents needle slippage and supports intricate patterns. Burlap serves as a cost-effective alternative, though its looser weave requires careful tensioning.
Yarn thickness impacts texture and density. Wool blends offer softness, while synthetic fibers withstand heavy use. Always test materials together – some fabrics demand specific proper maintenance techniques post-creation.
Planning Your Design and Preparing the Fabric
Your creation’s visual success starts with strategic pattern selection. Choose visuals that balance artistic ambition with textile practicality. Bold shapes and defined edges translate better than delicate details in this medium.
Projecting Your Vision or Sketching Freestyle
Modern crafters often use budget-friendly projectors to trace patterns directly onto fabric. This method ensures precise placement of complex elements. Flip asymmetrical designs horizontally before projecting – you’ll work from the fabric’s reverse side.
Freehand drawing works well for geometric patterns or abstract concepts. Spontaneous creators enjoy this approach’s organic flow. Keep charcoal pencils handy for easy adjustments during sketching sessions.
Photorealistic images need simplification for textile translation. Reduce color counts using editing software’s posterize function. This creates clear boundaries between hues, making the tufting process smoother.
Limit first projects to 3-5 colors for manageable yarn changes. Oversized elements maintain clarity after fiber movement from use. Test your scaled design by viewing it from across the room before committing.
Setting Up Your Tufting Frame
A solid foundation transforms your creative vision into tangible art. Your workspace configuration directly impacts both comfort and output quality. Proper preparation prevents yarn snags and uneven patterns.

Building a Sturdy Frame
Start with straight lumber measuring 3cm x 5.5cm for structural integrity. Basic woodworking skills suffice – miter joints at 45 degrees or simple screw connections work equally well. Pre-drill holes to prevent wood splitting during assembly.
Consider adding triangular feet or cross supports for stability. Many creators clamp their frame to workbenches for optimal height. Size your construction based on available backing materials to minimize fabric waste.
Attaching Fabric Securely to the Frame
Two primary methods exist for mounting your base material. Staple guns provide permanent fixation but limit reuse potential. Carpet gripper rods offer adjustable tension and multiple project compatibility.
Align the fabric grain parallel to the frame edges for consistent stretch. Proper tension resembles a drum surface – tight enough to bounce a quarter, loose enough to allow slight give. For detailed design considerations, explore specialized guides addressing common setup challenges.
Securing the Backing Fabric and Establishing Tension
Proper tension transforms your workspace into a precision canvas. Begin by securing one edge of your material to the frame using heavy-duty staples or clamps. Work clockwise around the structure, tightening incrementally after each attachment point.
Monks cloth simplifies alignment with its visible grid pattern. These guide lines help maintain straight edges during stretching. Apply steady pressure without forcing - the goal is drum-like firmness, not maximum strain.
Test tension uniformity by pressing different zones with your palm. Ideal resistance feels like tapping a ripe watermelon. Loose areas will sag, while over-tightened spots might distort the weave pattern.
| Tension Level | Fabric Feel | Suitability |
|---|---|---|
| Perfect | Springy rebound | All projects |
| Over-Tightened | Rigid surface | None |
| Loose | Wavy texture | Small wall art |
Your tufting gun requires consistent resistance to feed yarn properly. Uneven stretching leads to skipped stitches or jammed needles. Complete this critical step before powering up your tool.
Adjustments take patience - allow 20 minutes for initial setup. Experienced crafters recommend checking tension again after 10 minutes of work. Materials naturally relax slightly during the creative process.
Detailed Guide: how to make Tufted Rug
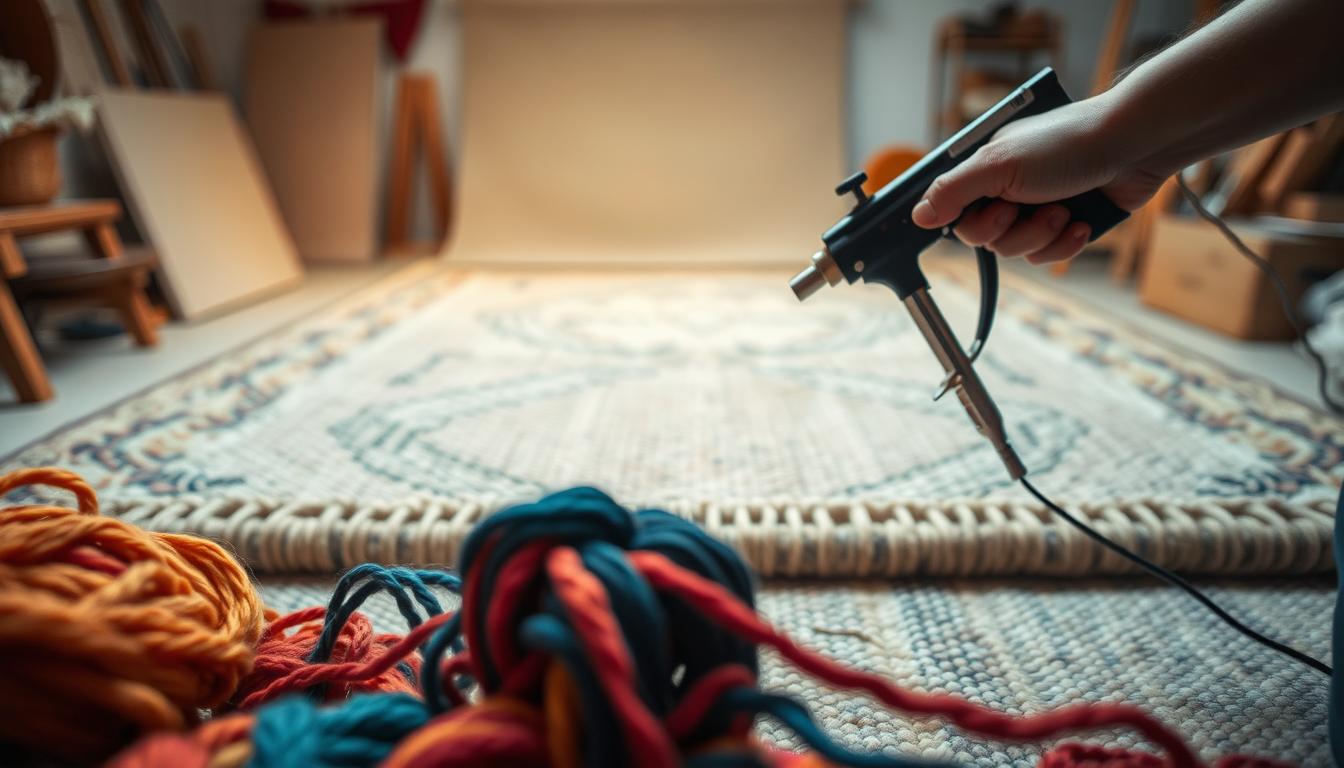
Precision becomes your greatest ally when operating the tufting gun. Always maintain full contact between the tool's metal plate and fabric surface. This ensures consistent yarn penetration and prevents skipped stitches.
Begin with straight-line drills on scrap material. Adjust the speed dial beneath the handle until the gun feeds fibers smoothly. These test runs help develop muscle memory for pressure control and forward motion rhythm.
Curved patterns demand strategic pauses. Move the gun in short arcs, repositioning slightly after each burst. This staggered approach maintains directional accuracy better than sweeping motions. Keep your dominant hand steady while guiding with the opposite.
Successful tufting relies on three elements: even pressure, controlled speed, and proper yarn tension. Check fiber flow frequently to prevent jams. If loops appear uneven, reduce movement pace or increase downward force.
Complete your rug by working section-by-section. Overlap rows slightly for dense coverage. Remember - mastery comes through practice, not perfection. Each project sharpens your skills for more intricate designs.
FAQ
What’s the difference between cut-pile and loop-pile tufting guns?
Cut-pile guns create plush, trimmed yarn surfaces, while loop-pile guns form uncut loops for textured rugs. Models like the AK-I or TC Pro offer adjustable settings for both styles. Choose based on your design’s desired texture.
Can I use burlap instead of monks cloth for tufting?
Monks cloth is preferred for its tight weave and durability, but heavy-duty burlap works for smaller projects. Always test tension first—loose fabric causes uneven tufting and yarn slippage.
How do I transfer a design without a projector?
Trace patterns freehand with chalk or fabric markers. For complex images, use carbon paper or grid methods. Secure the fabric tightly to avoid shifts during tracing.
Why does my tufting frame warp during use?
Warping occurs with weak materials. Build frames from kiln-dried wood or metal bars. Reinforce corners with brackets and check tension regularly—over-tightening fabric also strains frames.
How do I fix loose yarn on the rug’s back?
Apply latex or carpet glue evenly across the backing fabric. Press firmly with a roller, then let dry completely. Trim excess threads before adding secondary backing for durability.
Can I reuse the same fabric after removing a rug from the frame?
Reusing fabric risks tears and uneven tension. Fresh monks cloth ensures consistent results. Save scraps for small patches or test tufting swatches instead.
What causes yarn loops to look uneven?
Inconsistent gun speed or uneven pressure creates irregular loops. Practice steady hand movements and maintain a 90-degree angle between the gun and fabric. Adjust depth settings as needed.
How do I prevent fraying around the rug edges?
Seal edges with binding tape or a serger before gluing. For DIY solutions, apply a thin line of hot glue along the perimeter and fold excess backing fabric inward.